Let us see how to Install Informatica On Windows 7:
I have mentioned the steps below and then i have added the Screen Shots for each and every step.
To Install Informatica On Windows 7 not only on windows 7 on any OS We need a Database which serves as the metadata for the informatica server,The Repository will have the metadata i.e information about the Source,Target,Mapping,Mapplets,Transformation To store this metadata we need a database.Here i have Used Oracle as the Database.
Step 1: Install The Database Initially. And Turn Off the Firewall Settings Before You Install
Step 2:Change the Compatibilty of the install.exe file to Windows XP Service Pack 3.Both The Server And Client Component has to be modified in to Windows XP Service Pack 3 Compatibility.
The Location Of install.exe for Server File is Given below:
Informatica_Software_Server_Folder\Server\Windows\Disk1\InstData\VM
The Location Of install.exe for Client File is Given below:
Informatica_Software_Client_Folder\Client\Disk1\InstData\VM


Step 2: Add the Environmental Variables of Informatica.(System Variable Add the bin Folder Location to the System Variables)
Right Click On My Computer--->Select Properites--->Select Advanced Settings(You Can See it in the Right Hand Side)--->Environmental Variables(You Can See at the Below of the Window)--->System Variables(You Can See a Vairable Called Path-->Click Edit and Specify the Location of the Informatica Installation Folder For Example
C:\oraclexe\app\oracle\product\10.2.0\server\bin;%SystemRoot%\system32;%SystemRoot%;%SystemRoot%\System32\Wbem;%SYSTEMROOT%\System32\WindowsPowerShell\v1.0\;C:\Informatica\PowerCenter8.6.0\server\bin (The One Which Is marked in Bold letters are added by Us to the Path C:is the disk Where i have installed informatica and the folder name is given is should be given till server Bin)


These Are the Two Steps Which You have to follow For the Installation In Windows 7 apart from this the Installation is Common For Windows xp and Windows 7
Step:1 Click on the Install.exe File
Step 2:SSelect the Language
Step3: Select Install New Installation If You Want to Upgrade Select Upgrade
Step4:Select the License Key
Step5:Specify the Location On Which You want to Install the Informatica
Step 6:Domain Configuration: Click Create New Domain At this Point Only You have to add the Bin Directory to The System Variables in the Machine adding the System variable is only for windows 7 not with other OS.
Specify the Database type here i have Used oracle You have to provide the Credentials about your database for example for Oracle,
Database URL:Localhost:1521 here you can either specify localhost or your system name both will work 1521 is the port number of Oracle,Then Provide the User name and password of your Database.
If you want you can test the Connection


Step 7: Node Configuration: Informatica Port Number is 6001 The Default User name is Given as Admin You can give User Defined Password ( Note:This is password which is given by us for informatica login).


Step:8 Uncheck the Run informatica Under the Different User Done.
Client Installation:
Step9:Informatica Client Installation its not a big deal its Just Next Next Process i have Added The Screen shots For Your reference.


Informatica Admin Console Settings:
In informatica Admin Console You have to Create two Services
1.Repository Services--->(Repository Acts as a Metadata)
2.Integration Services-->(The Integration Service moves data from sources to targets based on workflow and mapping metadata stored in a repository. When a workflow starts, the Integration Service retrieves mapping, workflow, and session metadata from the repository. It extracts data from the mapping sources and stores the data in memory while it applies the transformation rules configured in the mapping. The Integration Service loads the transformed data into one or more targets.)
Start--->Programs--->Informatica-->Services--->Informatica Power Center Administration Console-->A Webpage will open Provide the Username and pass word of the Informatica(Username is admin password is the one which you provided while installing server i.e step:7


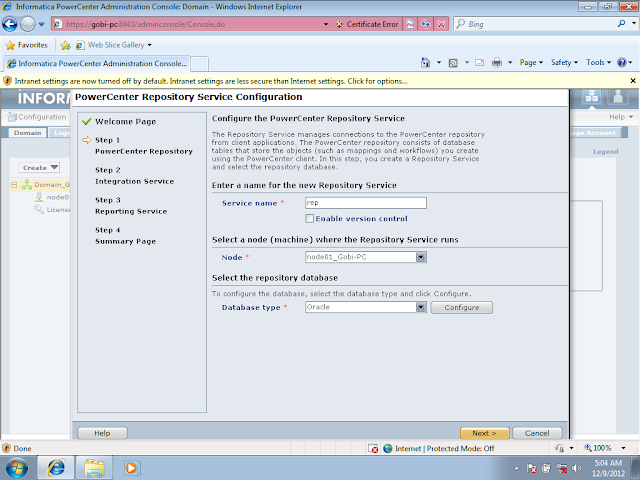
Repository Configuration:
Service Name:User Deifned Name Here i have Used Rep
Node:Its will be selected by Default
Database Type:I have selected oracle then Click on Configuration and provide the credentials

Integration Service Configuration:
Service Name:User Defined Name Here i Have used Int
Character String is Ascii


 Configuration With Repository window:


I have mentioned the steps below and then i have added the Screen Shots for each and every step.
To Install Informatica On Windows 7 not only on windows 7 on any OS We need a Database which serves as the metadata for the informatica server,The Repository will have the metadata i.e information about the Source,Target,Mapping,Mapplets,Transformation To store this metadata we need a database.Here i have Used Oracle as the Database.
Step 1: Install The Database Initially. And Turn Off the Firewall Settings Before You Install
Step 2:Change the Compatibilty of the install.exe file to Windows XP Service Pack 3.Both The Server And Client Component has to be modified in to Windows XP Service Pack 3 Compatibility.
The Location Of install.exe for Server File is Given below:
Informatica_Software_Server_Folder\Server\Windows\Disk1\InstData\VM
The Location Of install.exe for Client File is Given below:
Informatica_Software_Client_Folder\Client\Disk1\InstData\VM


Step 2: Add the Environmental Variables of Informatica.(System Variable Add the bin Folder Location to the System Variables)
Right Click On My Computer--->Select Properites--->Select Advanced Settings(You Can See it in the Right Hand Side)--->Environmental Variables(You Can See at the Below of the Window)--->System Variables(You Can See a Vairable Called Path-->Click Edit and Specify the Location of the Informatica Installation Folder For Example
C:\oraclexe\app\oracle\product\10.2.0\server\bin;%SystemRoot%\system32;%SystemRoot%;%SystemRoot%\System32\Wbem;%SYSTEMROOT%\System32\WindowsPowerShell\v1.0\;C:\Informatica\PowerCenter8.6.0\server\bin (The One Which Is marked in Bold letters are added by Us to the Path C:is the disk Where i have installed informatica and the folder name is given is should be given till server Bin)


These Are the Two Steps Which You have to follow For the Installation In Windows 7 apart from this the Installation is Common For Windows xp and Windows 7
Step:1 Click on the Install.exe File
Step 2:SSelect the Language
Step3: Select Install New Installation If You Want to Upgrade Select Upgrade
Step4:Select the License Key
Step5:Specify the Location On Which You want to Install the Informatica
Step 6:Domain Configuration: Click Create New Domain At this Point Only You have to add the Bin Directory to The System Variables in the Machine adding the System variable is only for windows 7 not with other OS.
Specify the Database type here i have Used oracle You have to provide the Credentials about your database for example for Oracle,
Database URL:Localhost:1521 here you can either specify localhost or your system name both will work 1521 is the port number of Oracle,Then Provide the User name and password of your Database.
If you want you can test the Connection


Step 7: Node Configuration: Informatica Port Number is 6001 The Default User name is Given as Admin You can give User Defined Password ( Note:This is password which is given by us for informatica login).


Step:8 Uncheck the Run informatica Under the Different User Done.
Client Installation:
Step9:Informatica Client Installation its not a big deal its Just Next Next Process i have Added The Screen shots For Your reference.


Informatica Admin Console Settings:
In informatica Admin Console You have to Create two Services
1.Repository Services--->(Repository Acts as a Metadata)
2.Integration Services-->(The Integration Service moves data from sources to targets based on workflow and mapping metadata stored in a repository. When a workflow starts, the Integration Service retrieves mapping, workflow, and session metadata from the repository. It extracts data from the mapping sources and stores the data in memory while it applies the transformation rules configured in the mapping. The Integration Service loads the transformed data into one or more targets.)
Start--->Programs--->Informatica-->Services--->Informatica Power Center Administration Console-->A Webpage will open Provide the Username and pass word of the Informatica(Username is admin password is the one which you provided while installing server i.e step:7


Repository Configuration:
Service Name:User Deifned Name Here i have Used Rep
Node:Its will be selected by Default
Database Type:I have selected oracle then Click on Configuration and provide the credentials


Integration Service Configuration:
Service Name:User Defined Name Here i Have used Int
Character String is Ascii


User Settings Is shown in The Screen Shots
If you have any doubts just post us we Will get back to you


No comments:
Post a Comment